Contents
After a flood, mold can quickly become a serious issue if not addressed promptly and effectively. You need to assess the extent of mold growth and ensure safety during the remediation process. Proper containment is essential to prevent the spread of spores. By understanding these initial steps, you set the stage for effective mold remediation techniques. What comes next is equally important in securing a mold-free environment moving forward.
Key Takeaways
- Inspect and document affected areas thoroughly to assess mold growth and identify sources of moisture after flooding.
- Remove and properly dispose of contaminated materials, such as soaked carpets and drywall, to prevent mold spread.
- Clean surfaces with detergent solutions and apply disinfectants like bleach or hydrogen peroxide to eliminate mold spores.
- Ensure thorough drying of all surfaces and materials to inhibit mold regrowth, using fans and dehumidifiers if necessary.
- Maintain regular inspections and moisture monitoring to prevent future mold issues and ensure ongoing safety in the environment.
Assessing the Extent of Mold Growth
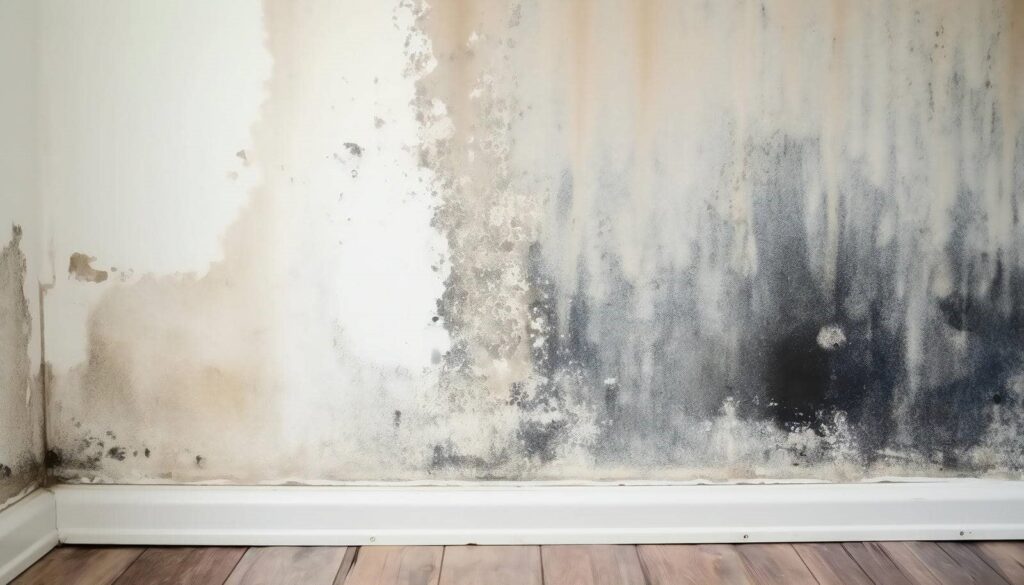
When you’re dealing with mold after a flood, the first step is evaluating the extent of the growth. Start by identifying visible mold with effective mold identification techniques, like examining walls, ceilings, and hidden spaces for discoloration or a musty odor.
Use a flashlight to inspect dark corners, as mold often thrives in less visible areas.
Next, consider mold testing methods to assess airborne spores and surface samples. You can use home testing kits or hire professionals for accurate results. Understanding the type of mold present is essential, as some may pose health risks.
Documentation is important; take notes and photos of affected areas for a thorough assessment. This initial evaluation will help you determine the necessary remediation steps and ensure you’re addressing the issue effectively.
Ensuring Safety and Protection
When tackling mold remediation, your safety is paramount.
Make sure you’re equipped with personal protective equipment to shield yourself from harmful spores, and consider air quality monitoring to track any potential hazards.
Personal Protective Equipment
Although mold remediation is essential after a flood, ensuring your safety during the process is paramount.
Using appropriate personal protective equipment (PPE) is a key element in implementing effective safety measures. Here are four essential items to evaluate:
N95 Respirator: Protects you from inhaling mold spores.
Safety Goggles: Shield your eyes from irritants and debris.
Gloves: Use nitrile or rubber gloves to prevent skin contact with mold.
Protective Clothing: Wear long-sleeved shirts and pants, ideally disposable or washable.
Air Quality Monitoring
To effectively manage the risks associated with mold growth after a flood, monitoring air quality is essential.
You need to assess indoor air quality regularly to identify the presence of mold spores, which can pose serious health risks. Start by using air quality monitors that detect humidity levels and mold spores in your environment.
Proper ventilation plays a significant role, so make certain that air circulates well in affected areas. If you notice elevated levels of mold spores, it’s imperative to act quickly by implementing remediation techniques.
Regularly testing and maintaining indoor air quality protects your health and fosters a sense of safety and belonging in your home.
Containing the Affected Area
To effectively contain the affected area after a flood, you need to seal off contaminated spaces from the rest of your home.
Using plastic sheeting can be an efficient way to create barriers, while employing negative air pressure helps prevent the spread of mold spores.
These steps are essential in minimizing exposure and protecting unaffected areas during the remediation process.
Seal Off Contaminated Spaces
Sealing off contaminated spaces is a crucial step in effective mold remediation after a flood. This prevents the spread of mold spores to unaffected areas, ensuring your home remains safe.
Here are some essential sealing techniques you should consider:
Identify Affected Areas: Locate all areas with visible mold or water damage.
Use Proper Materials: Opt for high-quality sealants and barriers that can withstand moisture.
Ventilation Control: Seal doors and windows to limit airflow, reducing the chances of spores traveling.
Establish Negative Pressure: Create a negative pressure environment to keep mold spores contained while you work.
Use Plastic Sheeting
Using plastic sheeting effectively contains the affected area during mold remediation, as it creates a physical barrier against the spread of spores.
The plastic sheeting benefits you by minimizing cross-contamination and protecting your living spaces from further mold infestation.
To install, first verify that the area is dry and free from debris. Measure and cut the sheeting to fit the space, then secure it with tape or staples, making sure to overlap seams for a tighter seal.
Pay attention to entry points, sealing them off to prevent airflow.
Employ Negative Air Pressure
Employing negative air pressure is a critical technique in mold remediation, especially after a flood. This method helps contain the affected area, preventing mold spores from spreading.
Here’s how you can effectively use negative pressure with air filtration:
Seal the Area: Use plastic sheeting to enclose the contaminated space, ensuring no air leaks.
Set Up Air Filtration Devices: Use HEPA filters to capture mold spores and improve air quality.
- Create Negative Pressure: Utilize fans to exhaust air from the area, maintaining a
lower pressure inside compared to outside.
Monitor Air Quality: Regularly check air quality to confirm that mold spores remain contained.
Removing Contaminated Materials
When tackling mold remediation after a flood, the first vital step involves removing contaminated materials. You’ll need to identify and assess items that have been affected by water and mold, such as carpets, drywall, and furniture.
For effective contaminated item removal, prioritize items that can’t be cleaned or salvaged. Use proper mold disposal techniques to ensure safety and compliance with local regulations.
Seal contaminated materials in plastic bags or containers to prevent further spread of spores during removal. It’s essential to wear protective gear, including gloves and masks, to safeguard your health.
Once removed, dispose of these materials responsibly, following guidelines for hazardous waste if necessary. By systematically addressing contaminated items, you create a cleaner, safer environment, fostering a sense of security for you and others.
This proactive approach mitigates mold risks and helps restore your space to a livable condition.
Cleaning and Disinfecting Surfaces
After removing contaminated materials, the next step in mold remediation is cleaning and disinfecting surfaces that may have come into contact with floodwater.
This vital process helps prevent mold growth and ensures a healthier environment for you and your loved ones.
Here are some effective surface sanitization techniques to take into account:
Use a mixture of water and detergent to scrub surfaces thoroughly, removing dirt and debris.
Apply effective disinfectant solutions like bleach or hydrogen peroxide, making sure you follow the manufacturer’s instructions for proper dilution and contact time.
Focus on high-touch areas such as doorknobs, light switches, and countertops, as these are common breeding grounds for bacteria and mold.
Allow surfaces to air dry completely, as moisture can promote mold growth if left unattended.
Using Dehumidifiers and Air Movers
To effectively combat humidity and prevent mold growth after a flood, using dehumidifiers and air movers is essential.
Start by strategically placing your dehumidifiers in the most affected areas; this maximizes dehumidifier placement effectiveness. Confirm they’re set to the appropriate humidity level, typically around 30-60%.
Next, incorporate air movers to enhance air circulation. Position air movers to direct airflow toward damp surfaces, boosting air mover efficiency and accelerating drying.
Consider using multiple units in larger spaces to cover more ground. Monitor humidity levels regularly; if they remain high despite your efforts, adjust your equipment or increase the number of units.
By combining these tools, you create an environment less conducive to mold growth, protecting your home and your health.
This proactive approach fosters a sense of community, as sharing tips like these can help others facing similar challenges.
Applying Antimicrobial Treatments
Applying antimicrobial treatments is a critical step in mold remediation following a flood, as it helps eliminate spores and prevent future growth.
You’ll want to focus on the effective use of antimicrobial agents to ensure thorough surface application. Here are four key considerations:
Choose the Right Antimicrobial Agent: Select agents specifically designed for mold and mildew to enhance effectiveness.
Prepare Surfaces: Clean and dry all surfaces before applying the antimicrobial treatment to maximize adherence and effectiveness.
Follow Application Instructions: Adhere strictly to the manufacturer’s guidelines for application methods and safety precautions.
Allow Proper Drying Time: Ensure that treated surfaces dry completely after application to prevent moisture retention, which can lead to mold resurgence.
Monitoring for Future Mold Growth
Even with thorough antimicrobial treatments, it’s crucial to stay vigilant about future mold growth. You should regularly inspect your home for signs of mold, focusing on areas prone to moisture, like basements and bathrooms.
Implementing effective mold prevention strategies can greatly reduce your risk. Use moisture control techniques, such as dehumidifiers and proper ventilation, to keep humidity levels in check.
Monitor the condition of materials like drywall and insulation, as these can harbor mold if they become damp. If you notice any leaks or water intrusion, address them immediately to disrupt potential breeding grounds.
Consider using moisture meters to assess humidity levels regularly, ensuring they remain below 60%.
Frequently Asked Questions
How Long Does Mold Remediation Typically Take After a Flood?
Mold remediation typically takes one to two weeks, depending on the severity of the flood damage. Understanding the remediation timeline is essential for effective flood recovery, ensuring your space is safe and healthy again.
Can I Do Mold Remediation Myself, or Should I Hire a Professional?
Deciding on DIY techniques versus professional services is essential. If you’re confident and equipped, tackle it yourself; otherwise, hiring experts ensures thorough, safe remediation, protecting your space and providing peace of mind amid potential peril.
What Are the Health Risks Associated With Mold Exposure Post-Flood?
Exposure to mold can trigger various symptoms like allergies, respiratory issues, and skin irritation. Long-term effects may include chronic health problems, especially for vulnerable individuals. You should address mold quickly to minimize these risks.
How Can I Prevent Mold From Returning After Remediation?
To effectively prevent mold’s menacing return, employ mold prevention strategies like humidity control. Keep indoor moisture below 60%, use dehumidifiers, ensure proper ventilation, and regularly inspect areas prone to dampness for ongoing success.
Are There Specific Products Recommended for Mold Removal?
For effective mold removal, consider using specialized mold removal products like hydrogen peroxide, vinegar, or commercial cleaning solutions. These effective cleaning solutions target mold spores, ensuring a thorough elimination and helping maintain a healthier living environment.
Recap
In the aftermath of a flood, it’s ironic how water, which nourishes life, can also foster mold’s relentless growth. By diligently evaluating mold extent, securing the area, and removing contaminated materials, you’re not just cleaning; you’re reclaiming your space. Cleaning surfaces and using dehumidifiers might seem tedious, but these steps are essential to prevent future infestations. Embracing these remediation techniques ensures your home remains a healthy sanctuary, free from the hidden dangers lurking in damp corners.
Recent Posts
Fire Damage Restoration Timeline for Homes
A house fire can turn a normal day into a long recovery in minutes. You’ll
What Homeowners Should Do After a House Fire
If a house fire leaves smoke damage through your hallway, you need to act in
5 Ways Soot Damage Can Affect Your Home
Soot damage can do more than leave dark stains on your walls. It can corrode