Contents
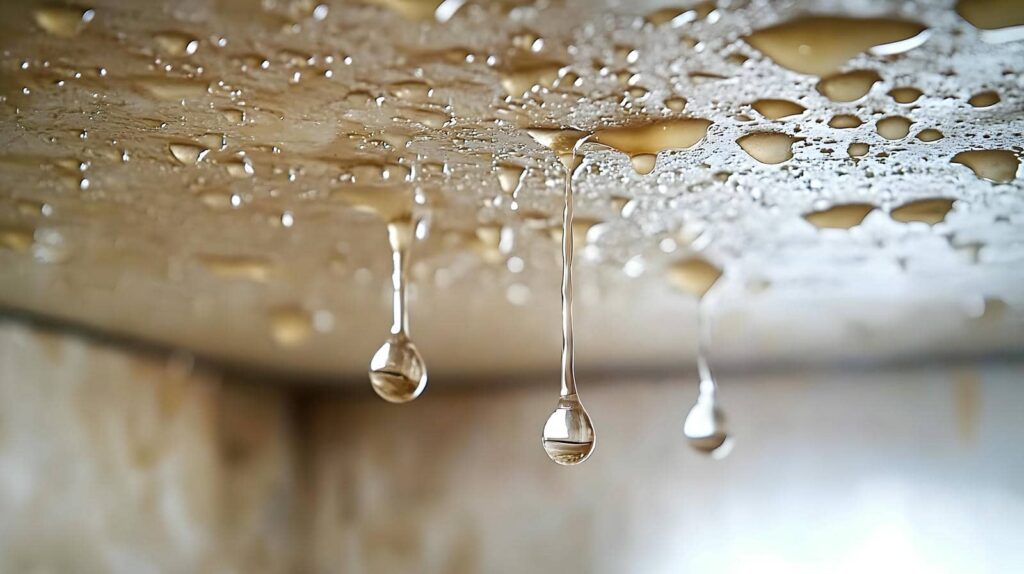
Ceiling water damage can be a silent threat, yet its effects are often loud and disruptive. Knowing how to address this issue methodically can save you time and money. From evaluating the damage to implementing prevention strategies, each step is essential. However, understanding the nuances of each practice is where many homeowners falter. Let’s explore the ten best practices that will help you effectively navigate the complexities of ceiling water damage repair.
Key Takeaways
- Thoroughly assess the source of the leak and document damage severity with photos and moisture measurements before starting repairs.
- Ensure safety by turning off water and electrical supplies in the affected area to prevent hazards during the repair process.
- Remove damaged materials like drywall and insulation carefully, disposing of them properly to avoid contamination and further damage.
- Utilize high-capacity fans and dehumidifiers to dry out the area, monitoring humidity levels to ensure effective moisture removal.
- Select suitable replacement materials and follow proper installation techniques to restore the ceiling while implementing preventative measures for future leaks.
Assessing the Extent of Water Damage
Before you begin any repairs, it’s essential to assess the extent of water damage in your ceiling. Start with water source identification; trace the leak back to its origin—be it a roof issue, plumbing problem, or condensation. Once you pinpoint the source, focus on damage severity evaluation. Inspect the ceiling for discoloration, warping, or sagging, as these signs indicate how deeply the water has penetrated. Use a moisture meter to measure the moisture level, ensuring you know whether it’s superficial or more extensive. Document your findings, noting the affected areas and the estimated size of the damage. This thorough assessment informs your repair strategy and helps you determine whether professional intervention is necessary. By accurately evaluating the situation, you’re taking the first vital step toward restoring your ceiling and ensuring your home remains a safe and welcoming space.
Turning Off Water and Electricity
Once you’ve assessed the extent of water damage, the next step involves ensuring safety by turning off the water supply and electricity in the affected area. Start by locating your main water shutoff valve, typically found near the water meter. Turn it clockwise to halt any ongoing leaks, preventing further damage.
Next, prioritize electrical safety. Identify the circuit breaker panel and switch off the power to the affected zone. If you’re unsure which breaker controls the area, shut off the main power supply to eliminate any risk of electrical shock while you work.
Always use a non-contact voltage tester to confirm that the electricity is off before touching any wiring or fixtures. Taking these precautions protects you and sets a solid foundation for the next steps in your repair process. Remember, safety is paramount in every home repair endeavor.
Removing Affected Materials
Begin the removal of affected materials by carefully evaluating which items need to be discarded or replaced. Use effective removal techniques to ensure safety and efficiency. Identify damaged drywall, insulation, and any other materials that show signs of mold or deterioration. Once you’ve assessed the situation, proceed with cautious material disposal to prevent further contamination.
| Material Type | Condition | Disposal Method |
|---|---|---|
| Drywall | Waterlogged | Cut out and discard |
| Insulation | Saturated | Bag and seal for disposal |
| Ceiling Tiles | Mold-affected | Remove and discard |
| Wood Beams | Warped or damaged | Inspect; replace if necessary |
| Electrical Wiring | Exposed or damaged | Hire a professional for removal |
Drying the Area Thoroughly
To effectively mitigate further damage, it’s important to dry the area thoroughly after removing affected materials. Start by using high-capacity fans to enhance air circulation, which is vital for moisture control. Position the fans to direct airflow towards damp surfaces, ensuring that all areas receive consistent ventilation.
Employ dehumidifiers to extract excess moisture from the air, complementing your drying techniques. Monitor humidity levels with a hygrometer, aiming to maintain a relative humidity below 60%. This helps prevent future issues, fostering a healthier environment.
If possible, open windows and doors to facilitate natural airflow, but be mindful of external weather conditions. Inspect surfaces regularly for persistent dampness, adjusting your approach as necessary. By diligently following these steps, you’ll create a solid foundation for the restoration process, ensuring your space remains safe and comfortable for everyone involved.
Inspecting for Mold Growth
While drying the area is essential, it’s equally important to inspect for mold growth, as moisture can lead to its rapid development. Start by using mold identification techniques like visual inspections and sniff tests to detect any signs of mold. Look for discoloration, fuzzy patches, or a musty odor, which often indicates hidden mold. Utilize a moisture meter to assess dampness, as high levels can signal potential mold issues.
If you suspect mold growth, consider employing mold removal methods such as scrubbing surfaces with a mixture of water and detergent or using specialized mold removal products. Remember to wear protective gear to ensure your safety during this process. If the mold covers a large area or is persistent, it might be best to consult a professional. By taking these steps, you’ll help ensure that your space remains healthy and mold-free.
Cleaning and Sanitizing Surfaces
Once you’ve identified and addressed any mold issues, it’s vital to focus on cleaning and sanitizing surfaces to prevent further complications. Begin by selecting appropriate surface disinfectants that are effective against potential pathogens. Always read the labels to verify compatibility with the surfaces you’re treating. Next, employ thorough cleaning techniques, starting with dry wiping to remove any dust or debris. Follow this by applying your disinfectant using a microfiber cloth or sponge, making sure you cover all affected areas.
Allow the disinfectant to sit for the recommended dwell time—this is fundamental for effectiveness. Afterward, rinse the surface with clean water if required and dry with a clean towel. Don’t forget to dispose of any materials used in the cleaning process properly. By following these steps, you’re restoring your space and fostering a safe environment for everyone.
Repairing Structural Damage
Before you can fully restore your ceiling, addressing any structural damage is essential to secure the integrity of your home. Start by inspecting the area for issues like sagging or cracks, which indicate compromised structural integrity. Use a level to check for any uneven surfaces and identify load-bearing beams or joists that may need reinforcement.
Once you’ve assessed the damage, employ appropriate repair techniques. For minor cracks, a combination of wood filler and sanding can help restore a smooth surface. If joists are severely compromised, consider sistering—attaching a new beam alongside the existing one to provide additional support.
For larger structural issues, consult a professional to verify that the repairs meet building codes. Remember, addressing structural damage preserves your ceiling and protects your home’s overall stability. Taking these steps will help foster a safe and secure environment for you and your loved ones.
Replacing Ceiling Materials
After addressing any structural damage, it’s time to focus on replacing the ceiling materials, which is essential for restoring both aesthetics and functionality. Selecting the right ceiling material options and mastering proper installation techniques can greatly impact your repair’s effectiveness.
| Ceiling Material | Pros | Cons |
|---|---|---|
| Drywall | Cost-effective, easy to paint | Susceptible to moisture |
| Ceiling Tiles | Easy installation, variety of designs | Can sag if not installed properly |
| Plaster | Durable, soundproofing | Labor-intensive to install |
| Wood Paneling | Attractive, adds warmth | Prone to warping |
| Metal Tiles | Stylish, fire-resistant | Can be expensive |
Choose a material that fits your home’s style and your repair capabilities. Follow the recommended installation techniques for best results, ensuring you create a ceiling that not only looks good but stands up to future challenges.
Preventing Future Water Damage
To prevent future water damage, you need to implement a proactive maintenance plan. Start with regular roof inspections to identify potential leaks, then ensure all plumbing fixtures are properly sealed to eliminate the risk of water escaping. Finally, improving drainage systems around your property will help direct water away from critical areas, safeguarding your ceilings from moisture intrusion.
Regular Roof Inspections
Regular roof inspections are essential for preventing future water damage, and conducting them at least twice a year can greatly enhance your home’s resilience. By prioritizing roof maintenance, you can catch potential issues before they escalate. Here are three key aspects to focus on during your inspections:
- Visual Assessment: Look for missing or damaged shingles, which can lead to leaks.
- Gutter Check: Verify gutters are clear of debris to facilitate proper water drainage and prevent overflow.
- Leak Detection: Utilize moisture meters or infrared cameras to identify hidden leaks that could compromise your roof’s integrity.
Seal Plumbing Fixtures
Sealing plumbing fixtures is essential for safeguarding your home against potential water damage, as even small leaks can lead to significant issues over time. Start by checking all visible connections, including faucets, toilets, and showerheads. Apply plumber’s tape or a suitable sealant to any joints that appear worn or loose. Regular plumbing maintenance helps identify these vulnerabilities early, preventing costly repairs down the line. If you’re considering fixture upgrades, opt for high-quality materials that are less prone to leaks, such as stainless steel or durable plastics. Don’t forget to inspect these fixtures periodically after installation to ensure they remain watertight. By taking these proactive steps, you’ll contribute to a secure and comfortable living environment for you and your family.
Improve Drainage Systems
Addressing plumbing issues is only part of maintaining a water-damage-free home; effective drainage systems are equally essential in preventing future water-related problems. A well-thought-out drainage system design can greatly reduce the risk of leaks and flooding. Here are three effective drainage solutions you should consider:
- Gutters and Downspouts: Make sure they’re free of debris and direct water away from your foundation.
- French Drains: Install these to redirect groundwater and prevent pooling around your home.
- Sump Pumps: Utilize these in basements to remove excess water and maintain dry conditions.
Documenting the Repair Process
Documenting the repair process is essential for ensuring accountability and facilitating future assessments. Use tools like digital cameras and moisture meters to record damage accurately at each phase. Following a systematic approach to reporting enhances transparency and helps track the effectiveness of your repairs.
Importance of Documentation
While you might be enthusiastic to start the repair process after ceiling water damage, documenting each step is vital for a successful outcome. This helps you keep track of progress and provides valuable information for future reference. Here’s what you should focus on:
- Photographic Evidence: Capture images of the damage before, during, and after repairs. This serves as a visual record of your efforts.
- Detailed Records: Maintain notes on materials used, time spent, and techniques applied. This information can be important for any follow-up work.
- Progress Milestones: Document key stages of the repair to assess your work and make sure nothing’s overlooked.
Tools for Recording Damage
Effective documentation of ceiling water damage requires the right tools to ensure accuracy and thoroughness. Start with a digital camera to capture high-resolution images of the affected areas, as visual evidence is vital for your water damage assessment. Use a moisture meter to gauge the extent of moisture saturation, which aids in prioritizing repairs. A notebook or digital device for recording observations helps maintain a clear timeline of damage progression and repair documentation. Include sketches or diagrams to illustrate the damage’s scope, enhancing understanding for all stakeholders involved. By utilizing these tools, you ascertain that your documentation is precise and fosters a sense of community and collaboration among those participating in the repair process.
Steps for Effective Reporting
With thorough documentation in place, the next step involves reporting the repair process in a clear and organized manner. This is essential for ensuring compliance with local regulations and facilitating any insurance claims. Here are three steps to guide you:
- Detail the Damage: Describe the extent of the water damage, including affected areas and materials involved.
- Document Repairs: List all repair actions taken, including dates and materials used, to create a detailed record.
- Include Supporting Evidence: Attach photographs, invoices, and any communications with contractors or insurance agents to substantiate your report.
Frequently Asked Questions
How Long Does the Entire Repair Process Typically Take?
The repair duration typically ranges from a few days to several weeks, depending on the extent of damage and necessary restoration steps. Establishing a clear project timeline helps manage expectations and ensures a thorough job.
Can I Repair Ceiling Water Damage Myself?
Can you tackle ceiling water damage with DIY repairs? Absolutely, you can! Just make certain you’ve got the right tools and materials, follow proper procedures, and prioritize safety to achieve a professional-looking fix.
What Tools Do I Need for Ceiling Repairs?
For ceiling repairs, you’ll need essential repair tools like a putty knife, drywall saw, and tape measure, along with ceiling materials such as drywall, joint compound, and primer. Gather these before starting your project for efficiency.
Will Insurance Cover Ceiling Water Damage Repairs?
Your insurance policies may cover ceiling water damage repairs, but check your coverage limits carefully. Each policy varies, and understanding these specifics ensures you’re prepared for potential out-of-pocket expenses during the repair process.
How Can I Tell if My Ceiling Is Structurally Unsafe?
To determine if your ceiling is structurally unsafe, conduct a thorough ceiling inspection. Look for signs of weakness like sagging, cracks, or water stains. If you notice these, consult a professional for further evaluation.
Summary
Effectively addressing ceiling water damage requires a methodical approach to ensure lasting repairs. By evaluating the damage, removing affected materials, and implementing preventative measures, you can safeguard your home from future issues. Isn’t it worth investing the time and effort now to avoid costly repairs down the line? Remember to document your process for future reference, as being thorough today can lead to peace of mind tomorrow.
Recent Posts
10 Best Flood Damage Restoration Methods for Homes
When disaster strikes your home with flood damage, knowing the best restoration methods can make
Top Flood Damage Restoration Techniques for Homes
Floods can devastate homes, yet effective restoration flood damage techniques can bring them back to
Step-by-Step Guide for Ceiling Water Damage Repair
Imagine standing beneath a sagging ceiling, water stains spreading like dark clouds overhead. It’s essential